Back to Kit 2
Home
On to kit 4Kit 3 The Wheels and Suspension
January 29th 2009
Hooray,
kit number 3 has arrived. A smallish but heavy box arrived at
7:25 am (me still in bed with a cuppa, watching telly!) First problem was that a bag containing all
the 'bits' had been punctured in transit and some of the bits had
fallen out. No problem? Well not if the box hadn't been stuffed
with shredded paper! A messy few minutes trying to make sure that
I wasn't "throwing baby out with the bath water", so to
speak. Stronger bags please, Andy!
Having
unpacked everything and checked the parts list supplied with the
excellent instructions to ensure all present and correct, we have
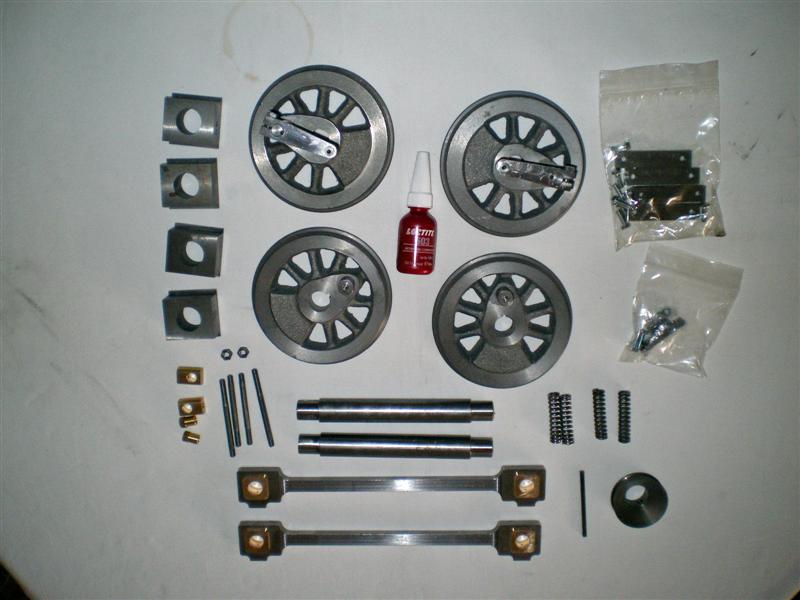
these parts to deal with:-
wheels
complete with crank pins and motion arms already fitted, axles, axle
boxes, springs, connecting rods, the axle pump eccentric and some
more bits and bobs.
(click on image to enlarge)
I read
through the instructions (as you do) and realise that this is a bit
more involved than just screwing metal plates together. The wheels are to be glued to the
axles (with a keyway to locate them) and once
stuck that's permanent. The
clear notes and a final box out which repeats what goes where just at
the critical moment, reassures me.
Examining
the parts more closely, I discover some nasty swirl marks on one of the
motion arms. I don't know what would have
caused that but it looks 'orrible. Out with the emery paper...
The
next question is what to do about painting the wheels. They are
machined from castings but the spokes and counter weights just have the
rough casting surfaces. I suspect they are cast iron, which I have no way of smoothing, so I just clean up some rough
flash edges and file off the high
points on the counter weights. I decide to paint the wheels
before assembly as I think that will be easier.
As Hammerite
doesn't need a primer, the first coat on the rough surface shreds the brush - it's a bit
like painting sandpaper. After the first coat though, it gets a
lot easier as the paint fills the pitting and starts to bring the whole
surface level with the high points. After 4 (or was it 5?) coats,
I've ended up with a nice smooth even coat. This number of coats
was necessary to cover the black metal showing through the paint.
One of my friends mentioned when I was painting the frames that
red can be a difficult colour to cover - he wasn't kidding!
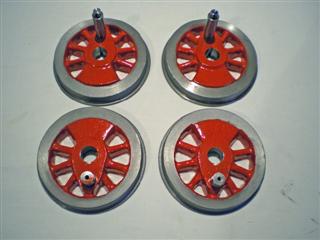
Now
that I've finished painting the wheels
I'll leave them to harden off
for a few days
before assembly.(click image to enlarge) In
the meantime, I do a trial fit
of the axle boxes to the horn guides. After removing some paint that's
crept around the
edges of the guides and smoothing out some minor burrs,
I have four nice smooth-moving axle boxes. This must be what
they
call "fettling". I've marked
each axle box and horn guide just so that I know which one goes where.
So
now it's time to put this lot together. I've never used Loctite
603 before so I'm not quite sure what to expect, like how long have I
got to fix this before it goes off? With Andy's instruction
ringing in my ears, I make sure the wheels with the long crank pins go
on the axle with the dimple (for the axle pump eccentric fixing screw).
The keys tap in easily and I feel quite chuffed(!) as I leave
them to go off overnight.
Next day, I sort out the axle
boxes and eccentric and put them on the correct axles with the last two
wheels to make sure I've got everything in the right order - getting a
bit paranoid now. When I'm sure, I glue the wheels on, tap in the
keys and then one wheel promptly slips halfway off the axle (even with
the key in place!) as I turn it over to wipe off the excess glue.
Anyway, next day all is well and I lay them in the horn guides to
make sure everything goes round as it should. I try to put
the coupling rods in place but they don't fit. After some
investigation, I find that both are slightly banana shaped so they're
never going to fit. A quick call to Andy and they are off to him
in the post for examination.
So
here we are in the final stages of kit 3. Fitting the spring
adjuster pins, I use the two lock nuts together to screw the pins into
the axle boxes as there doesn't seem any other way apart from mole
grips which would make a right mess. Fit the O rings to the pump
piston and push that in - very tight but there's nothing about oiling
it. Time to fix the eccentric and strap and then I hit a snag.
This will no doubt bring a smile to the more experienced
amongst you, but bear in mind I've never built anything like this
before. For some reason Andy doesn't mention anything about
fixing the eccentric to the axle in the instructions.
Now picture
this:- an eccentric cam, fitted loosely to an axle that has both
wheels glued on permanently. On the 'long' side of the cam, a
grub screw protrudes and there is a dimple on the axle to take a screw.
Insert allen key and twist. No movement whatever. Twist harder -
nothing. Remove grub screw and see something further down the
threaded hole. Now I assumed it was some sort of pin that was
going to be pushed down by the grub screw so that it meshed with the
dimple on the axle and that the pin had jammed. Remember, I can't
take the eccentric off to inspect it as the wheels are glued on.
(perspiration begins to form on brow - I must be missing something
here) A light tap with a small hammer and a thin drift - nothing.
Feeling an idiot I call Andy. I'll send you another
one, until I point out the wheels are glued on. Andy flummoxed
for a minute then - Oh I remember, I put two screws in to make sure
they wouldn't come out! What I thought was a pin is in fact
another grub screw half way down the thread! Insert allen key
into hole and twist - Yes! problem solved. Thanks and
apologies to Andy who very kindly says not to worry. The moral of the
story? I should have checked that I could fix the eccentric to
the axle before I glued the 2nd wheel (or Andy could have mentioned the
two grub screws in his instructions). One game all I think,
Andy!
After
that it's a simple matter (even for me!) to lightly oil the axle boxes,
fit the springs, bolt up the axle box keeps, adjust the springs, fit the eccentric
strap, and couple up the water pump. Here's some pictures of the
finished article so far. The footplate and running boards in the right
hand picture are painted underneath,but I'll wait until they are finally fixed before I paint the topsides in satin black. (The
red handle in the background is nothing to do with the engine, it's
part of my Clarke lifting table with my Polly2 on it under a rug)
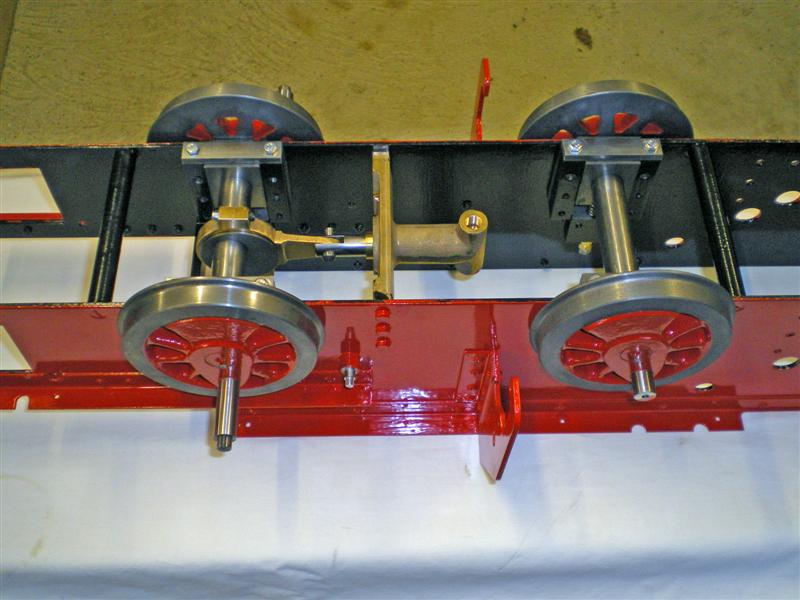
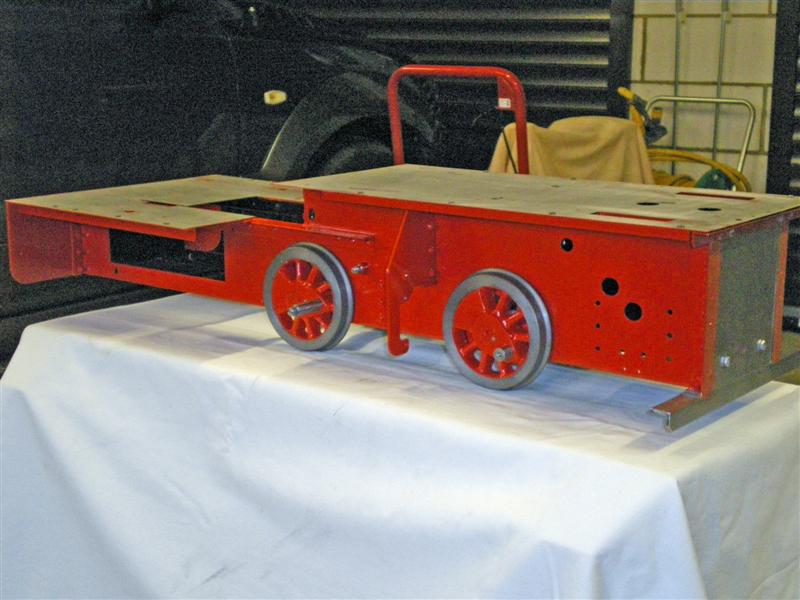
(click images to enlarge)
So
there we have it. It's February 10th 2009 so it's taken me about
two weeks to get kit 3 finished. I've learnt a lot (and probably
given Andy some more grey hairs) and look forward to the next kit which
is due towards the end of the month and will include the cylinders I
understand. Not sure if the valve gear is also included - have to
wait and see. Oh, and I await Andy's verdict on the coupling rods as well.
I
can't quite believe how much I've written about this - I hope you
stayed with me and will come back in a couple of weeks to see how I get
on with Kit 4.
Postscript:
A week later two nice straight coupling rods arrive and they just slip
into place, and Yes, everything goes round as it should!
Back to Kit 2
Home
On to kit 4